If you climb to the summit of Malinche volcano on a clear day, you’ll have a gorgeous 360° view including four of Mexico’s even more massive volcanoes! This guide has everything you need to know about hiking Malinche volcano all the way up to the peak.
La Malinche volcano, also known as Malintzin, Matlalcuéyatl, or a few other variations, is Mexico’s 6th highest peak at 4,461 m (14,636 ft). It’s close enough to Mexico City and Puebla to summit in a day-trip, and it’s one of the most popular hiking destinations in Mexico!
Malinche might be the biggest mountain you’ve ever seen, or it might be a casual warm-up before you tackle even bigger volcanoes. In either case, this complete guide will help you safely and successfully hike / climb Malinche to the summit.
History
Malinche, the Woman
The historical figure known as Malintzen or Malinche was born around the year 1500 on the Yucatan Peninsula. She was sold into slavery before she was 10 years old, then served in different communities where she learned the Yucatec and Nahuatl languages.
When the Spanish first arrived, Malinche and 19 other slave women were gifted to Hernán Cortés as a peace offering. He quickly discovered her language skills. She learned Spanish and served as his translator, much like Sacagawea did for Lewis and Clark in the USA.
She played a key role in the Spanish conquest of the Aztecs and other native groups in what would eventually become Mexico. For that reason, her name has become a symbol of betrayal.
However, it’s important to remember that she was a slave and didn’t have any choice. This was also before “Mexico” was a unified country. Some argue that she was reasonable in teaming up with outsiders (the Spanish) to take down her enemies (the Aztecs and other not-so-peaceful cultures).
The New York Historical Society has a great biography about Malinche if you want to read more or watch a short video.
Malinche, the Volcano
Malinche volcano began to form about 35 million years ago in a chain of volcanos known as the Trans-Mexican Volcanic Belt. It was previously thought to be extinct, but evidence in the last thirty years or so suggests it could once again awaken. It is currently classified as a dormant stratovolcano.
Radiometric dating suggests the last Plinian-type (big) eruption was roughly 10,500 years ago. Ash plumes were blasted tens of kilometers into the stratosphere and pumice rocks rained down around the crater.
The most recent volcanic deposits found suggest smaller eruptions occurred about 3,100 years ago, causing ash fallout and small pyroclastic flows.
Here’s some geology reading, in case you’re interested.
Since one day of hiking Malinche volcano is miniscule compared to the geologic time scale, I’m not too worried about being caught on the mountain the moment it wakes up. You’d be really unlucky if it happened to you.
Malinche National Park
In 1938, over 46,000 hectares were dedicated as protected land when Malinche National Park was established. From lower to higher elevations, you’ll find oak and pine forests, grassland tundra with sandy / ashy deposits, and scarped lava formations around the crater and peak.
How much does it cost to enter Malinche National Park?
Recently, CONANP (like the National Park Service of Mexico) began charging $54 MXN ($2.75 USD) per person for an entry wristband on weekends. It’s still free on weekdays.
There’s some free parking on the south side of “Antojitos Don Julio”, or you can park inside the gates of the Centro Vacacional IMSS Malintzi for $20 MXN ($1 USD). The paid parking is maybe a bit safer, and the ground is more even so you won’t bottom-out your car.
Right next to the restaurant, there’s often someone offering horseback rides (just on weekends, I think). I’ve also seen a llama hanging out there, so I think that’s rideable, too. They charge $70 MXN ($3.50 USD) for a half-hour ride.
Flora and Fauna
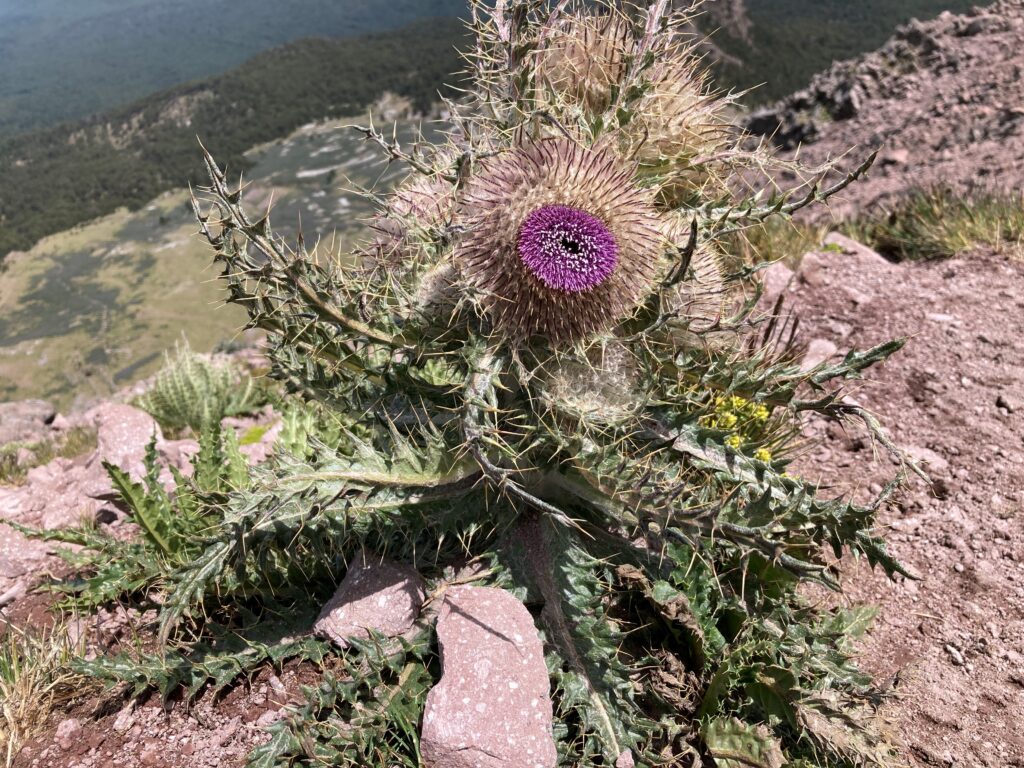
Almost a thousand species have been identified within the park, 22 of which are endemic to the regional highlands of the Trans-Mexican Volcanic Belt.
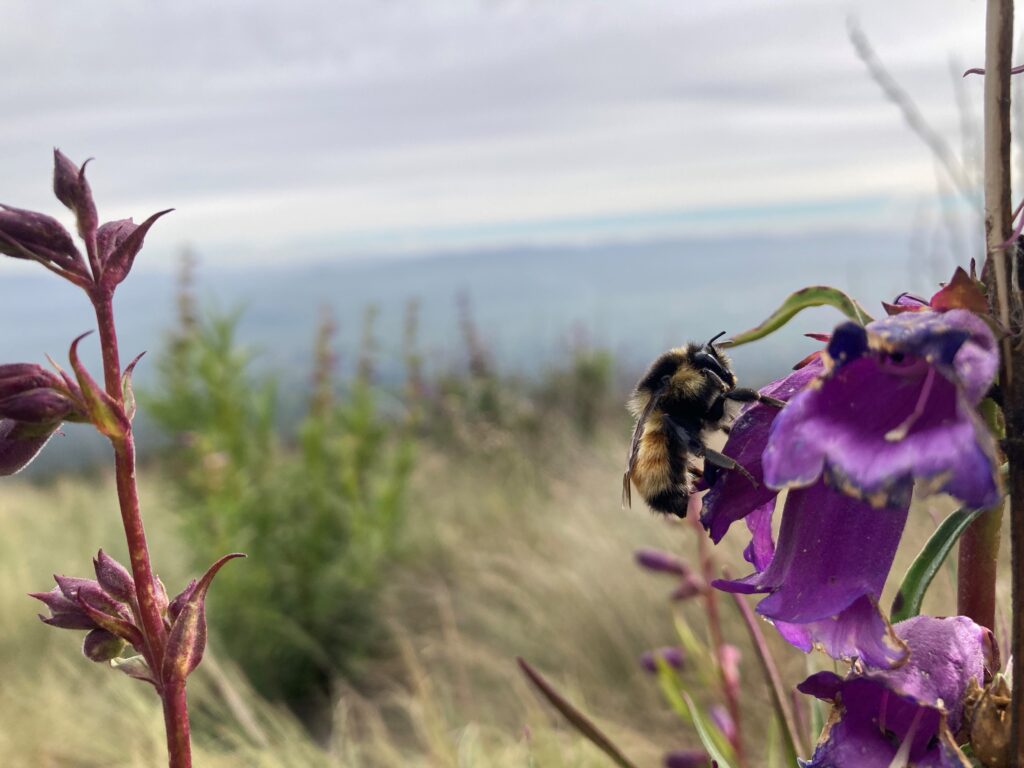
As you’re hiking Malinche, you’ll see plenty of colorful wildflowers, mosses, and mushrooms (especially during rainy season). You might find some lizards, insects, rodents, and birds, including woodpeckers, hummingbirds, red warblers, hawks, and eagles.
Do I need to hike with an organized tour or guide?
No, an organized tour group / guide is not really necessary for hiking Malinche. Logistics and route finding are not difficult, especially after reading the information in this guide.
However, there are additional benefits of going with an organized tour if you prefer. Although it’s a bit more expensive, tour groups can simplify logistics, provide extra security, teach you about culture and nature, help with any language barriers, or simply introduce you to new friends.
There are several tour agencies from Mexico City or Puebla, but I recommend the certified guides from Oactli Tours in Tlaxcala. One of their leaders, Armando Vázquez, was my classmate in a mountaineering course. He also teaches university courses in tourism, so I know he’s legit.
Oactli Tours emphasize traditional cultural experiences. When I went with them, the guides performed some ritual offerings to honor the volcano on the way up. They charge $700 MXN ($35 USD) for a guided hike up La Malinche (A.K.A. Matlalcueye). They also do night hikes when there’s a full moon!
How to Minimize Effects of High Altitude
Even fit, healthy people sometimes struggle with altitude. If you start to feel lousy (headache, nausea, dizziness, disorientation, etc.), it might be best to listen to your body and head back down.
However, there are several steps you can take before and during the hike to mitigate effects of altitude on your body and mind:
- Hydrate. Not only should you sip water and electrolytes frequently during the climb, but also drink plenty of liquids during the days leading up to the hike.
- Eat well. Your body will have to work hard, so you’ll need extra energy. Bring snacks with calories, protein, and potassium. I always bring a banana, Nature Valley protein bars, nuts or chapulines, and a sandwich or two. Chapulines are a traditional snack of fried grasshoppers. When in Rome… but I also understand not everyone’s into that, so bring some salted nuts or other proteins if you prefer.
- Take time to get acclimated. Most of central Mexico is high above sea level, so staying in Mexico City, Puebla, or anywhere nearby a few days before your climb can make a big difference in getting your body acclimated. The mighty Tlaxcalteca warriors used to train at altitude in the magical town of Tlaxco, Tlaxcala. For convenience, you can stay in a cabaña or camp next to the trailhead in the Centro Vacacional La Malintzi at about 3,100 meters (10,170 ft).
- Take breaks as you climb. The faster you go, the less time your body has to acclimate.
- Bring ibuprofen in case you get a headache.
- Protect yourself from the sun. At higher altitudes, there’s less atmosphere above you to filter the sun’s rays, so you burn faster. I recommend bringing a hat, neck covering (i.e., Buff) sunglasses, sunscreen, SPF lip protection, long sleeves, pants, etc.
How Difficult is the Climb?
La Malinche is a “14er”, as Colorado folks would say for mountains over 14,000 ft. It’s higher than any mountain in the lower 48 United States, so hiking Malinche is no joke.
However, there are some characteristics that make Malinche easier to climb than others of its size.
Its tropical latitude means it can be climbed pretty much year round without technical winter gear or risk of avalanches.
There might be a few days every year when there’s enough snow above the tree line to need crampons and an ice axe to climb safely. But you usually won’t need any technical equipment.
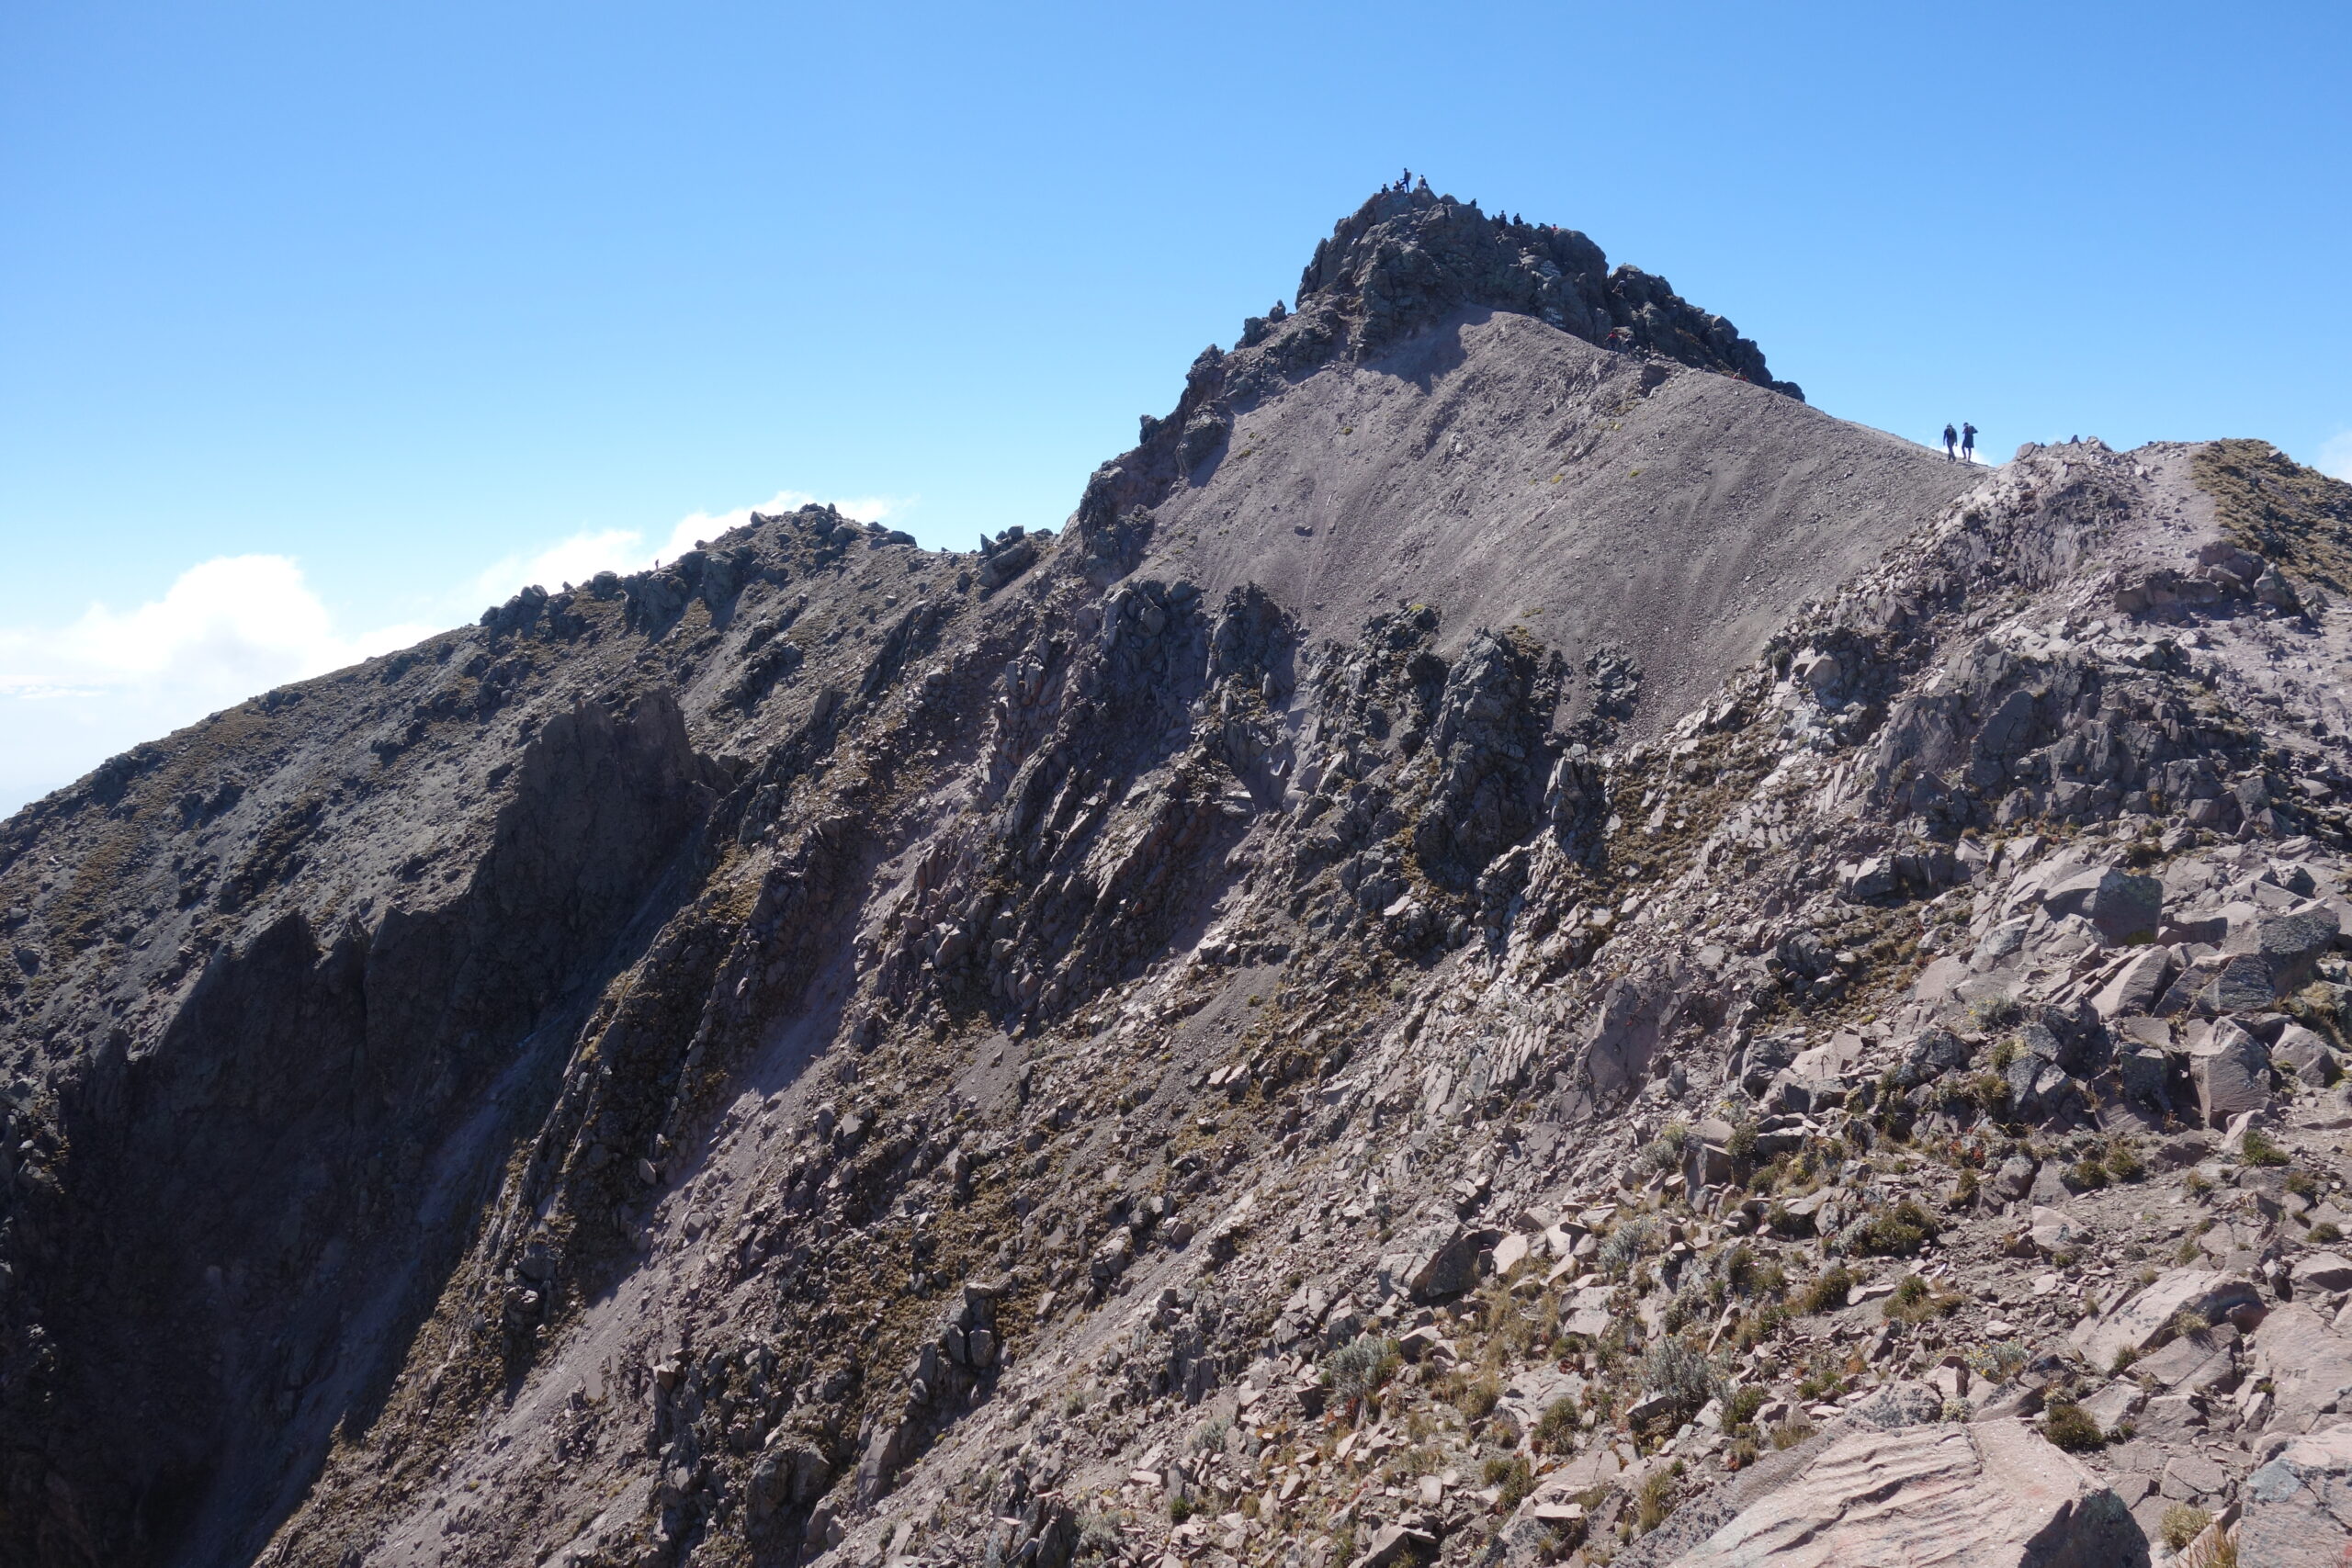
You can mostly walk up the mountain, but there’s a little bit of rock scrambling near the summit for 100 meters or so.
Most people with decent physical condition can make it to the peak in 4 or 5 hours from the Centro Vacacional La Malintzi. That means maybe 7 or 8 hours there and back, but you should always allow extra time if you can.
The hike is about 12.2 kilometers round trip with 1,275 meters (4,183 ft) of elevation gain. That means lots of uphill (then lots of downhill on the way back)! The incline is not too steep in the beginning, but it gets steeper as you progress.
Many climbers go without a helmet, but I recommend wearing one. Unfortunate events could happen to anyone; a slip and fall with tired legs, a rogue rock bouncing downhill at you, a tree branch falling on a windy day, etc. Cool people wear helmets.
There are usually some park rangers roaming the park in an ATV or by foot. You can sometimes find them hanging out near the tree line on weekends. Try to locate them in case of emergency.
Step-By-Step Guide to the Summit (with pictures!)
There are a few different routes, including the Altamira, Ixtenco, Axaltenco, and San Isidro / Canoa routes. This guide focuses on the most popular: the Centro Vacacional Route.
The trail is pretty straight forward from the Centro Vacacional La Malintzi, especially if you go on a busy weekend when you can follow the crowd. However, it’s always a good idea to familiarize yourself with a route before you hike it. You never know when a dense fog might roll in and make things more difficult.
The shuttle from Apizaco drops you off next to the “Antojitos Mexicanos Don Julio Malinche” shop and restaurant. If you need some extra motivation during the hike, remember that delicious food is at the finish line: quesadillas, tacos, huaraches, mole de panza soup (weird texture, delectable flavor), and pulque are waiting to be devoured when you get back down.
Start walking uphill to find the road, which you’ll follow for a few minutes until you see the trail into the forest on your right.
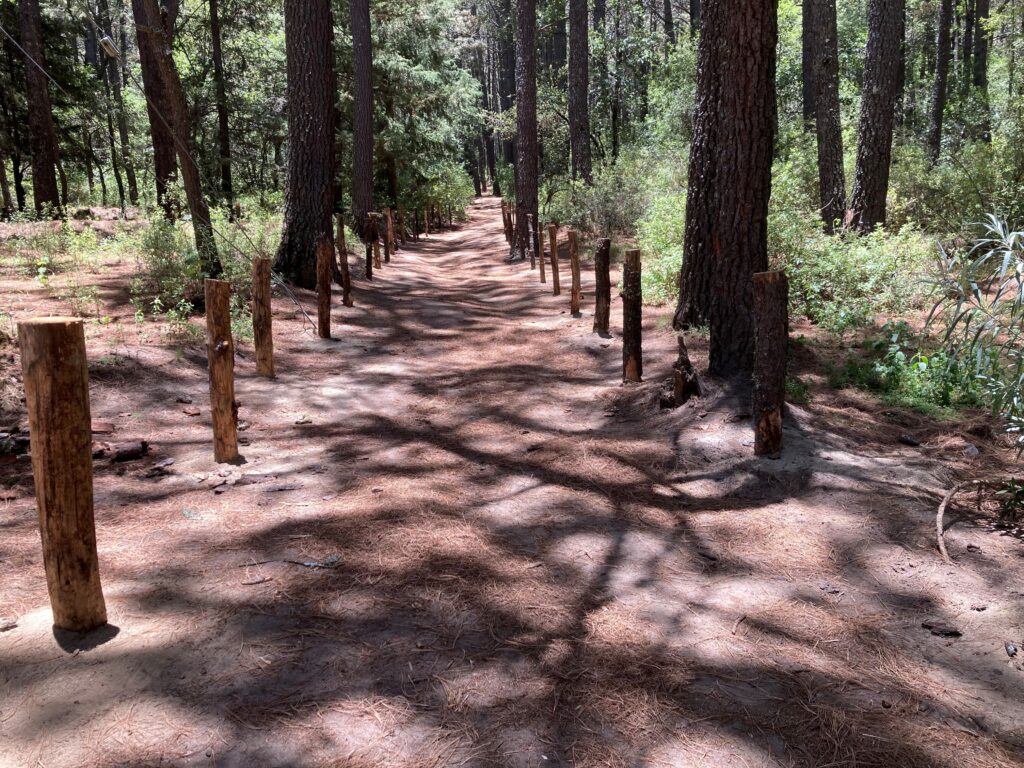
There’s a paved, winding road you’ll cross over about a dozen times as you continue through the forest. The last time you come to the road, you won’t see a trail on the other side. Just follow the road uphill (to the left) for a few hundred meters until you find the trail again on your right, and a sign with some rules (see photo below).
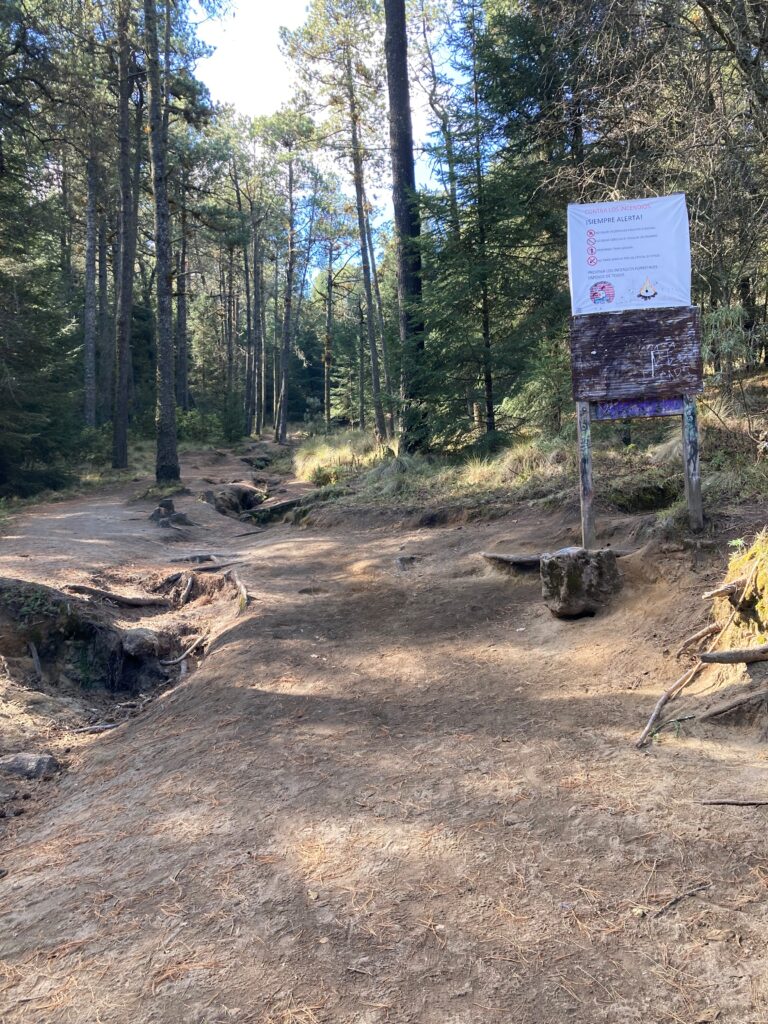
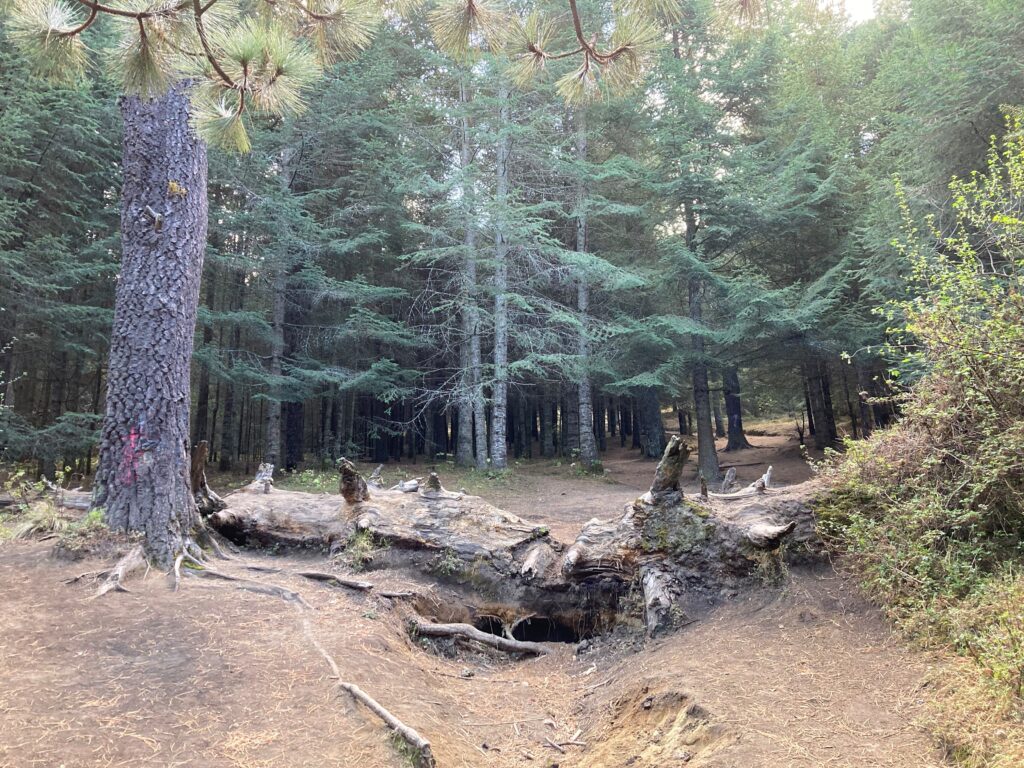
Continue up the trail past the sign. Shortly after, you’ll come to a giant, dead tree crossing the trail (see photo below). If you go at my pace, you’ll be here after 1 hour of hiking. You’re a fourth of the way to the summit!
You’ll notice the trail starting to get steeper. As you take breaks and catch your breath, turn around and peek through the trees for some nice views. They keep getting better as you progress toward the summit.
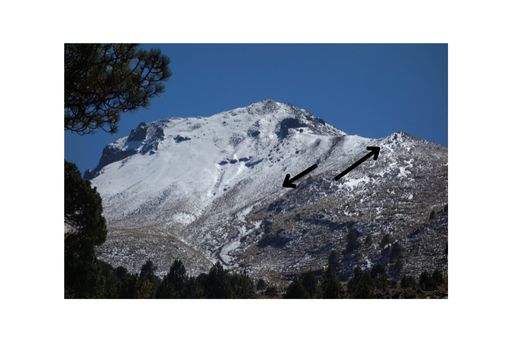
Eventually, the dense forest starts to thin as you approach the tree line. You’ll see the impressive Pico Tlachichihuatzi, A.K.A. “La Chichita” rock formation on your right (if you want to get on top, make your way around and up the ridge on the other side. It’s not easy, but also not as difficult as it looks).
Above the tree line, the trail sort of dissolves into a grassy tundra known as “La Arenal” because of how sandy / ashy the soil is.
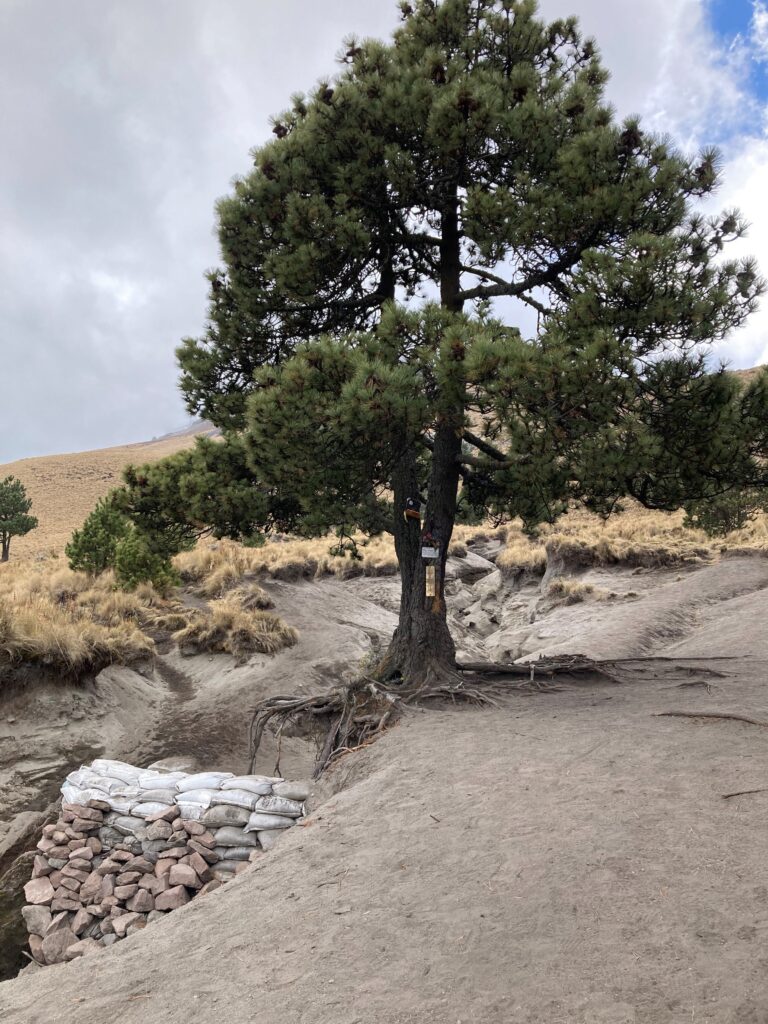
You’ll walk along an eroded gully on your left, and you’ll come to the tree in the next photo with some memorials on the trunk. It may seem like you’re close to the summit, but you’re only about halfway there. Two hours down, two more to go if you’re keeping up with my pace!
This tree is a good place to take a break and re-apply sunscreen. You won’t find much shade between here and the summit.
As you begin that steep climb up to the ridge, stay toward the grassier areas further to the right. The grass roots stabilize the soil, giving you solid ground to walk up.
If you do find yourself on softer ground, you can kick your toes in a bit with each step so you don’t slide back down too much (advantage for boots with stiff toes).
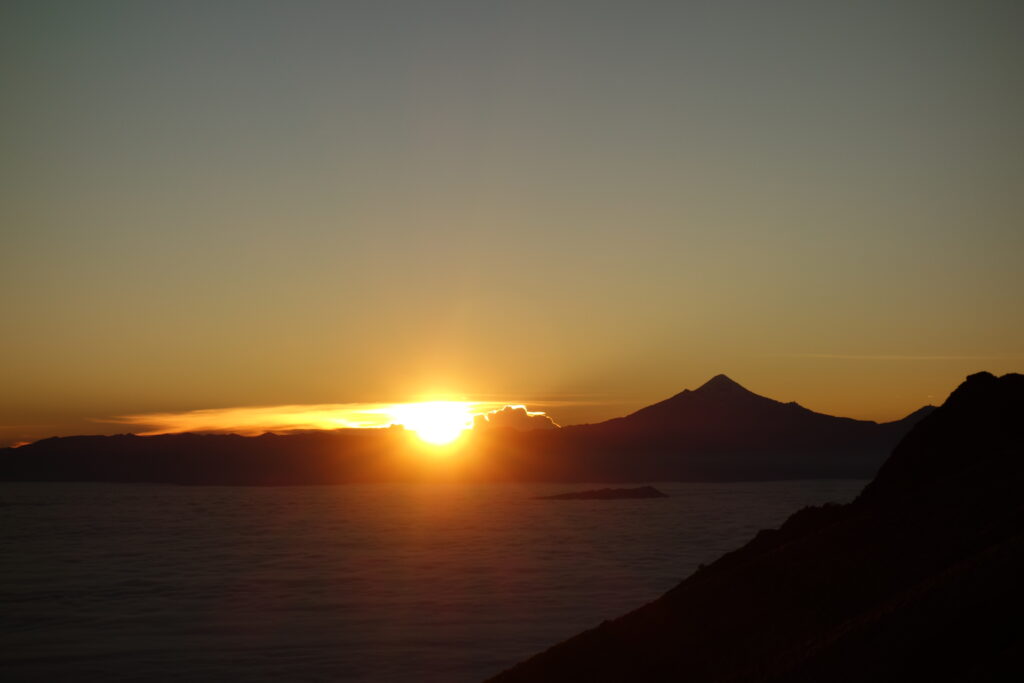
As you progress toward the ridge, look to your left and you might see the snow-capped Citlaltépetl / Pico de Orizaba peeking over the side of La Malinche. It’s the highest peak in Mexico.
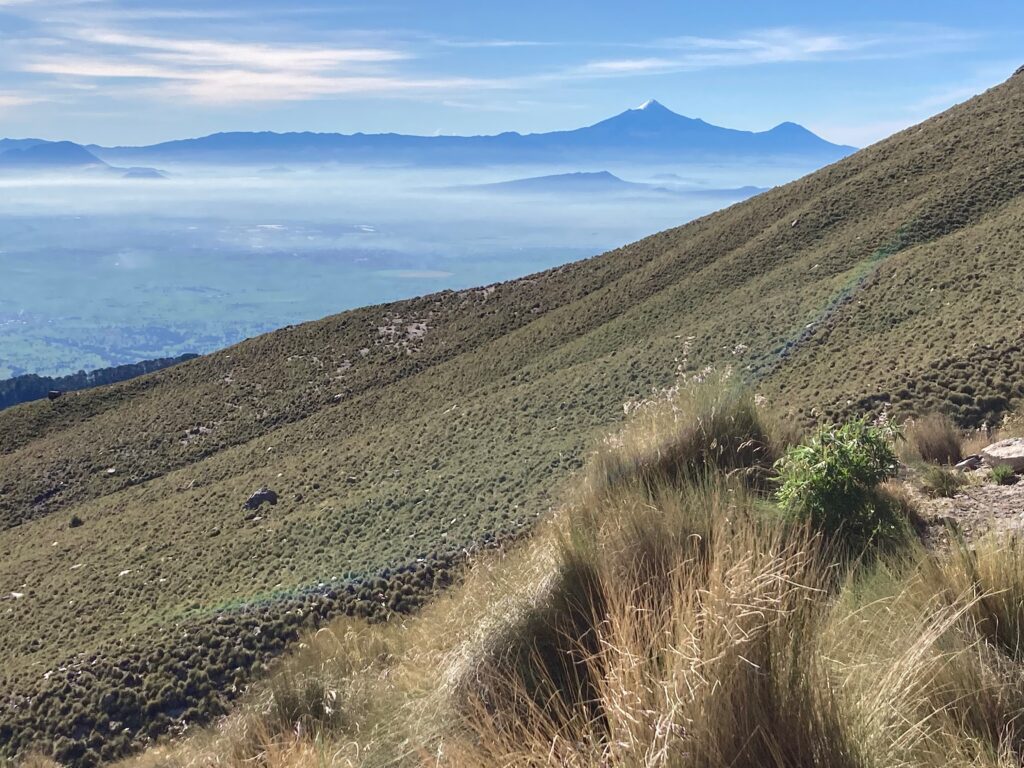
From the top of that ridge, you might get a view of Mexico’s second and third highest volcanoes, the very active Popocatépetl and the “sleeping woman” Iztaccíhuatl, respectively.

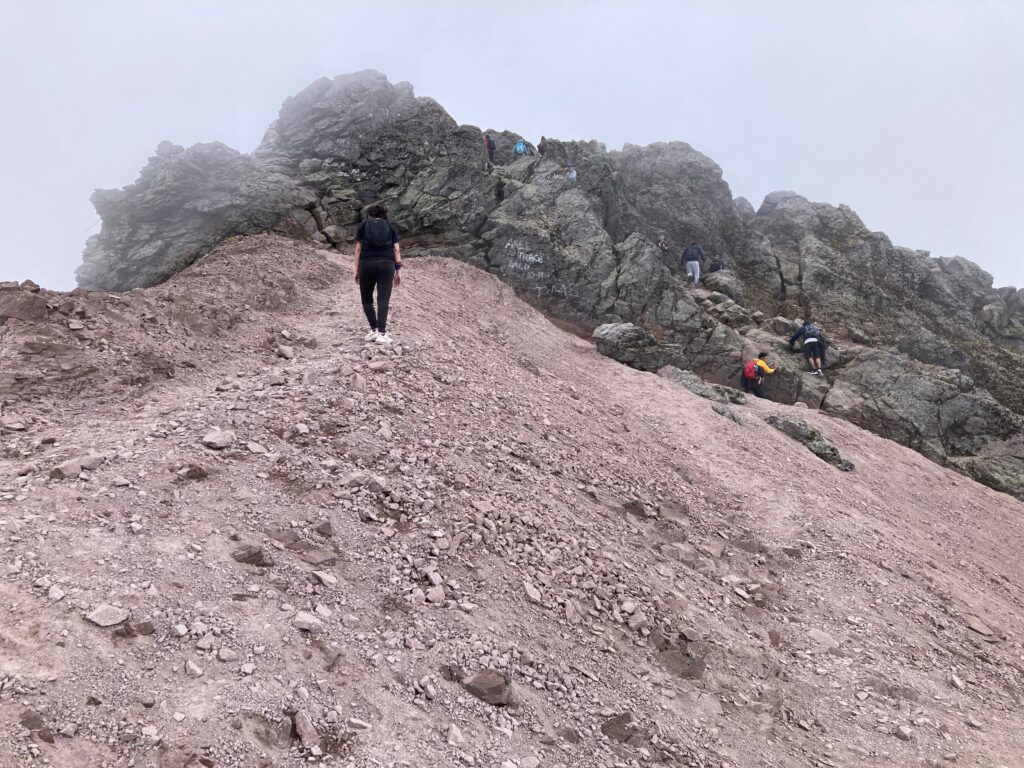
Follow the ridge up and shortly after you’ll begin the rock scramble up to the crater.
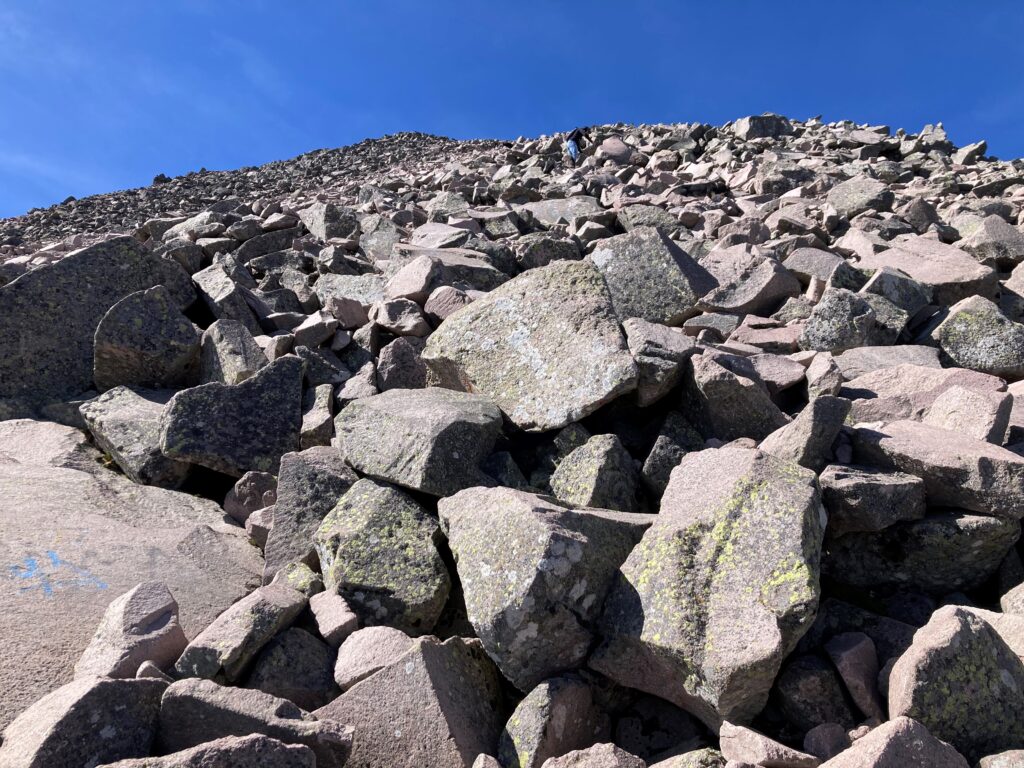
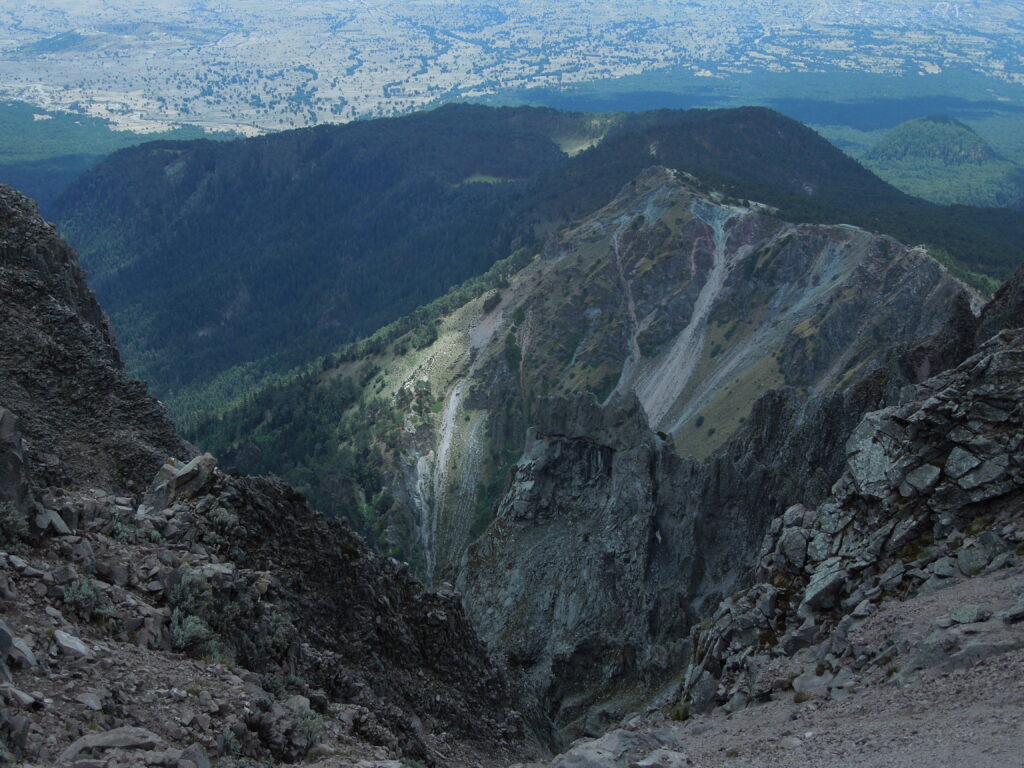
Shortly after the rock scramble, you can carefully peek over the edge. You’ll be humbled by mesmerizing lava formations in the giant crater on your left.
On the way back down, I take the sandier route from the top of the ridge. Find the softest areas, dig your heels in (contrary to any “stay on your toes” advice from any other sports). Take wide steps to maintain your balance. If you do fall, try to fall backwards toward the closer ground.
A controlled jog in the sand can get you down quickly without losing your ability to stop quickly. Watch out for loose rocks, and shout “piedra!” if you accidentally knock one downhill toward someone.
Map
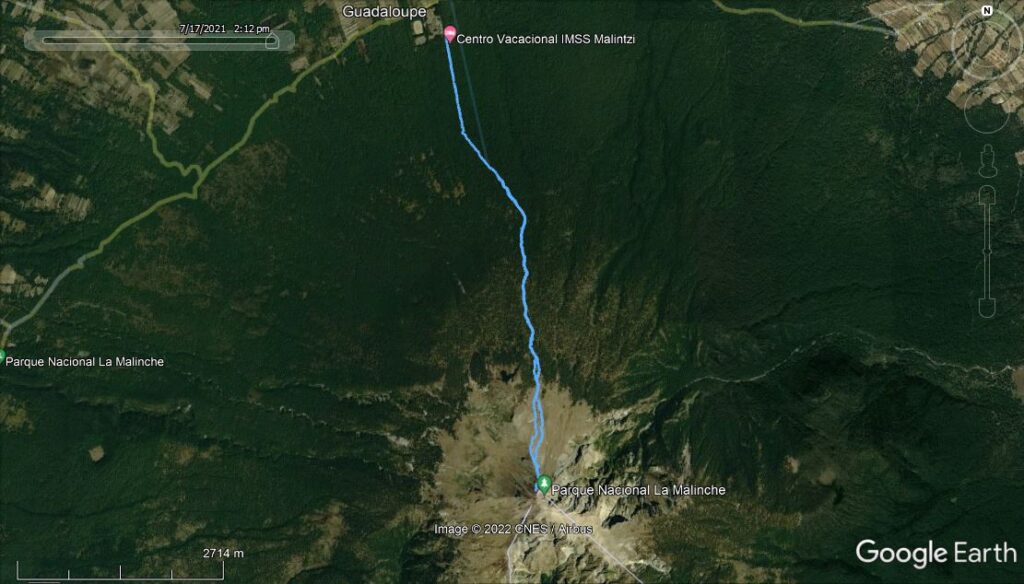
If you don’t have a GPS device (or even if you do and want a backup), download an offline map on your cell phone. AllTrails is an excellent website/app for maps and other hiking information.
Google Maps also works. Just make sure you download the offline map before you arrive and lose cell signal. To do so on the phone app, tap the circle with a letter next to the search bar. Then tap “Offline maps” and select the area you want to download.
And in case you want to refer to this guide along the way, make sure you take screenshots or download it onto your phone for offline viewing!
Weather
The best weather forecasts for La Malinche (and other mountains across the globe) can be found at the mountain-forecast website. It shows weather at different altitudes and times of day. But take it with a grain of salt. Mountain weather is notoriously unpredictable.
Since cell reception is sparse on the volcano, make sure you check the weather before you get close. I usually get some reception a couple hours into the hike, so I like to refresh the page for an updated forecast when I can.
On mountains as high as this, you should be ready for anything, despite what the forecast says. Weather at the summit is often near or below freezing and winds can be pretty brutal. I’ve been hailed on more than once up there.
Generally speaking, May through September is the rainiest time of year, but that doesn’t necessarily mean it will rain all the time. Clouds and rain usually arrive in the afternoons. That means you should start as early as possible for clear skies and beautiful views.
Summer and fall are also hurricane season. La Malinche isn’t that close to the coast, about 180 kilometers, but remnants of a tropical storm can still cause some extra wind and rain on the mountain. Pay attention to hurricanes and tropical storms in the Gulf of Mexico.
November through March are generally drier and cooler. Although there’s less precipitation, it’s often in the form of snow which can cover the peak for a bit. The dry season also gets pretty dusty, so covering your mouth and nose isn’t a bad idea (handkerchief? Buff? COVID mask?)
Since snow is rare in Mexico, you’ll find large crowds of people at La Malinche any weekend after a snowfall. It’s often just a thin layer and well-trampled by the crowds of people, so technical equipment beyond waterproof shoes/boots usually isn’t necessary.
Complete Packing List
No disclaimer here because I don’t get paid from any companies mentioned. These are just honest opinions from a guy who’s climbed La Malinche about 25 times.
You should keep a few things in mind while packing. Don’t wear cotton because it doesn’t breathe nor dry well. You should personalize your packing list based on your own needs and preferences, but this list should get you prepared for a successful day-trip.
- Backpack: My 26-liter Cotopaxi Inca pack is excellent for a day-trip.
- Water and electrolytes: There aren’t any lakes, streams, or other reliable water sources along this route, so you’ll have to carry it with you, at least 2 liters. I bring a third leader, a Nalgene with electrolytes, but I drink a lot. Sports drinks are fine, but I buy a packet of electrolyte powder (suero en polvo) from a pharmacy for a less sugary thirst quencher.
- Food: Lunch and snacks high in protein, calories, and potassium.
- Boots: Any comfortable hiking shoes/boots should get you up and down just fine. If there’s any snow or rain, you might want Gore-Tex or other waterproof membranes/treatments. If you want to own a piece of Mexican alpine history, order a pair of Revilla boots. For over 60 years, they’ve been hand-made to last a lifetime with soles of recycled airplane tires. Read Patagonia’s article, “The Maestro”, for the fascinating story of Mexican mountaineering pioneer and bootmaker, Raúl Revilla. I’ll be honest, my “mid-mountain” Revilla boots are pretty heavy and stiff. They gave me blisters when I used them to climb Malinche. I think discomfort is often a trade-off for durability, but I’m still happy I have them for shorter hikes / work boots. Maybe I just need to break them in a bit more… If you want to order a pair for $1,200 MXN ($60 USD), you can directly contact the son of the legend, José Alfredo Revilla Sandoval (I did so on Facebook). He’ll instruct you to trace and measure your foot, and depending how busy he is, he’ll probably have your tailor-made boots ready to ship in about 6 weeks.
- Socks: Darn Tough are my favorites. I bring two pairs in case one gets wet, or I might wear them both if I feel a blister forming.
- Shirt: Any breathable shirt is fine. I like long sleeves for sun protection.
- Hiking pants: Lightweight pants with a few pockets work well for me.
- Underwear: SmartWool, ExOfficio, and Rab all make breathable hiking underwear I’ve been happy with. Investing in a good pair or two is worth every penny.
- Sunglasses: I usually wear my Bollé shades, but I bring more intense Julbo glacier glasses if it’s snowy. Make sure they provide good UV protection.
- Sun hat: My Outdoor Research Helios hat has been my favorite for over a decade, and it seems like it’ll last another. Lightweight, packable, easy to wash, drawcord keeps it on in the wind…
- Sunscreen: The sun burns you faster at altitude.
- SPF lip protection: The sun and wind can really do a number on your lips.
- Warm hat: Freezing rain/snow or cold winds can get pretty brutal, and a warm hat can make a huge difference while taking up hardly any space. Make sure it’s helmet compatible if necessary. I like my merino wool stocking cap from L.L. Bean.
- Helmet: I got a basic helmet at Decathlon in Mexico City for $550 MXN ($27.50 USD).
- Trekking poles: For long climbs, they ease the pressure on the knees. If your knees don’t thank you at the end of the day, they almost definitely will in 10 years.
- Gloves: I don’t always use them, but I’m glad to have them when I do. It’s nice to separate your hands from cold rocks as you’re scrambling near the top in a brisk wind.
- Neck gaiter / Buff: I always wear one lightweight neck covering for protection from the sun. I throw on a second heavier fleece layer if it’s cold.
- Fleece jacket: I often get hot while hiking with it on, but I’m happy to have it when I take my backpack off for a break and the wind hits my sweaty back.
- Rain shell: Especially if it’s the rainy season (May through September). A lifesaver against wind and rain.
- Hand sanitizer: After bathroom breaks, before meals.
- Toilet paper: For bathroom breaks and blowing your nose. If you need to poop, please bury it to minimize the environmental impact. Even used toilet paper should be carried out with you.
- Plastic bags: I use one for trash. Especially if I need to pack out some used toilet paper or mushy banana peels, I don’t want trash floating around in my backpack. If it rains, I like to have one for my phone, emergency lighter, unused toilet paper, and anything else that could be damaged by water.
- Watch: Or a phone. Keep track of time, especially if you need to catch a shuttle back to town.
- GPS / map and compass: You can also download a Google Map of the area for offline viewing on your phone.
- Power bank: And any necessary cables for charging your phone, headlamp, GPS, camera, etc.
- Cash: Park admission is free on weekdays, and $54 MXN per person ($2.70 USD) on weekends. You should also bring extra cash. Just in case you start late, get injured, aren’t a fast hiker, or just don’t want to leave the mountain, you should be prepared to stay a night in a cabin at the Centro Vacacional La Malintzi for $1,100 MXN ($55 USD). The last shuttle to Apizaco leaves at 5pm, so it’s good to have another option in case you don’t make it back in time.
- Binoculars, camera: If you want snapshots or a closer look at volcanoes, birds, towns, etc.
- IN CASE OF EMERGENCY
- Emergency bivvy / “space blanket”: Prevents hypothermia if you get stuck on the mountain overnight.
- Whistle: Three blasts is the universal signal for distress.
- Bar of soap: Use it with water to clean any open cuts, scrapes, or wounds. It also helps lubricate a sticky zipper, which could be useful for a jacket, tent, sleeping bag, or backpack.
- Antibacterial ointment: Neosporin or something similar to clean and protect open wounds.
- Gauze and dressing: For wrapping wounds.
- Multitool: Useful for many things, cutting gauze or clothing after an injury, for example.
- Nitrile gloves: Some people are allergic to latex.
- Lighter: Campfires aren’t allowed due to risk of wildfire, but if you’re lost or stranded for a night, careful use of fire could save your life.
- Headlamp / flashlight: In case you’re still on the mountain when the sun goes down.
If you’re camping, add a tent, sleeping bag, sleeping pad, extra food and water, and maybe a camp stove to the list. Also a bigger backpack to hold those extra items.
You could probably do just fine without some of the items on my list. You might see people at the summit with just a 2-liter bottle of soda and some potato chips. I’d rather be over-prepared and ready for the worst.
Transportation
Driving
In Google Maps, plug in “Resort IMSS Malintzi” and you’ll be on your way. It’s about a 2 hr, 45 min drive from downtown Mexico City and 1 hr, 20 min from downtown Puebla.
When you arrive, you’ll see a gated area on your right where you can park inside for $20 MXN ($1 USD).
For free parking, instead of entering the gated area, continue on the road 50 meters to the south side of the “Antojitos Don Julio” restaurant.
Public Transportation
Step 1 from Mexico City: TAPO Bus Terminal to Apizaco
Find the ATAH / SUPRA bus company and buy a ticket to Apizaco for $214 MXN ($11 USD). The first one leaves at 6 am, which should give you just enough time to find the first shuttle to Malinche a few blocks from the ATAH Apizaco terminal (see below for instructions from Apizaco).
Step 1 from Puebla: From CAPU Bus Terminal to Apizaco
Find the ATAH bus company and buy a ticket on the fast and comfy Ejecutivo bus to Apizaco for $86 MXN ($4.25 USD). They depart every half hour from 5 am to 10 pm. It will take about an hour.
There’s a cheaper Ordinario bus for $47 MXN ($2.40 USD) that leaves every 15 minutes between 6:30 am and 7:45 pm. However, it’s not as comfortable, and it makes stops along the way so it takes much longer.
Step 2: From Apizaco to “Centro Vacacional Malintzi” A.K.A. “Resort IMSS Malintzi”
From the town of Apizaco, there are three options if you’re not driving yourself: Shuttle van, taxi, or Uber.
You can take a shuttle van (known as a colectivo or combi) directly to the “CV Malintzi”. It’s a 40-minute ride for $30 MXN ($1.50 USD) per person. However, there are only a few each day, so make sure you’re there on time (schedule below).
***Combi drivers take advantage of hikers and foreigners, sometimes charging $40 MXN per person. The lady at the restaurant told me I shouldn’t pay more than $20 MXN, but maybe that was before global inflation. As far as I can tell, it shouldn’t be more than $30 MXN.
To find the shuttle, get to Aquiles Serdán Street between Hidalgo and Juárez Avenues, right in front of a big store called Elektra. Look for a shuttle with a sign that says, “CV Malintzi”, or ask someone which one goes to La Malinche.
If you go on a weekend, the shuttle might fill up, especially if there’s snow on the mountain. They sometimes send a second van to accommodate everyone, but I’d get there a bit early just in case.
Apizaco to CV Malintzi: 8:20am, 12:20pm, 4:20pm.
To return to Apizaco, get on the colectivo van right where it dropped you off, in front of the gated entrance to the Centro Vacacional Malintzi. Another way to describe the stop is on the road right in front of the “Antojitos Don Julio” restaurant and store.
CV Malintzi to Apizaco: 9:00am, 1:00pm, 5:00pm.
You can catch a standard taxi from Apizaco, or there are a few app-based taxi services as well, including Uber, which just recently began providing service in Apizaco. Other ride apps include Didi and Pronto.
You can enter / exit Malinche National Park from 7am – 7pm, so don’t get there too early or too late or you’ll be stopped at the gate.
Cell phone ride apps are a good way to make sure you don’t get charged extra just for being a foreigner. It should be about $230 – $300 MXN (up to about $15 USD) for the one-way trip. On the Uber app, the destination you want is, “Resort IMSS Malintzi”.
IMPORTANT: You should keep in mind that there’s no cell signal at the Centro Vacacional La Malintzi. Catching a shuttle van for the return trip is the best option because apps require cell signal.
Where to Stay
On the Mountain
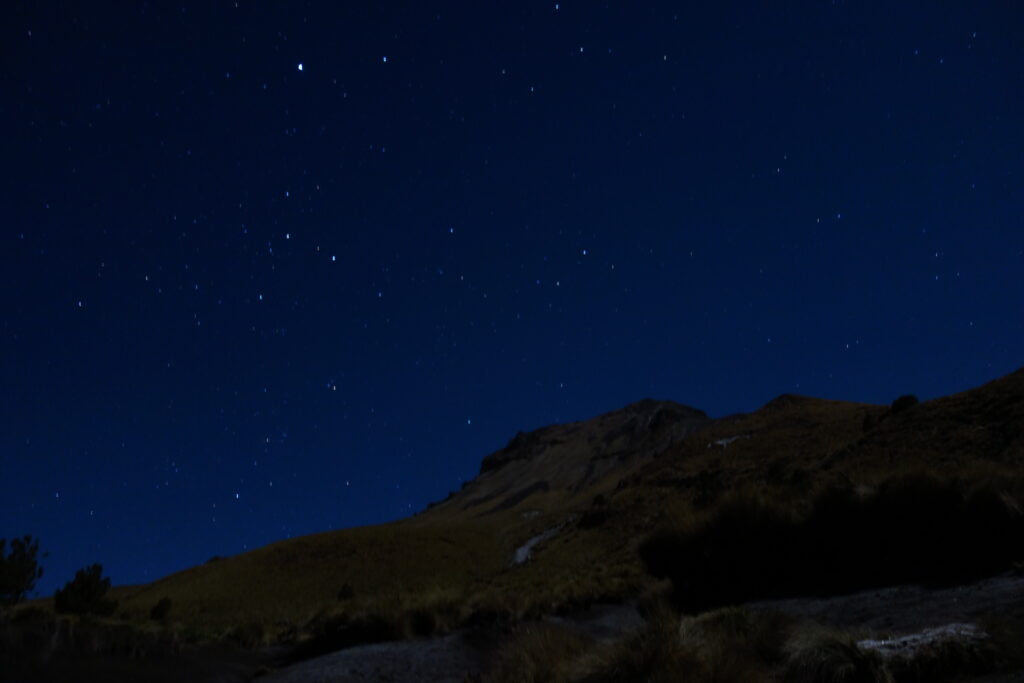
You can camp right on the mountain if you want. There aren’t any designated campsites beyond the trailhead, but right near the top of the tree line is a popular spot because it’s one of the few flat areas along the way. There is no extra fee for camping on the mountain.
Getting above the trees provides a stunning view of the starry sky above the mountaintop. And a chance for early birds to finish the climb as the sun rises over the tallest volcano in Mexico, Pico de Orizaba.
You can stay right by the trailhead at the IMSS Centro Vacacional Malintzi. They have cabins starting around $1,100 MXN ($55 USD), or you can bring your own tent to camp for $85 MXN / person ($4.25 USD).
In Apizaco
There are also plenty of hotels in Apizaco if you prefer to stay in town before or after the hike:
The Hotel Malinalli is a good budget option, with rooms starting at $500 MXN / night ($25 USD).
After the long hike, you might want to pamper yourself in a 4.5-star hotel with indoor pool, spa, and traditional temazcal sauna (prior arrangements required). The Hotel San Ángel has rooms starting around $1,200 MXN / night ($60 USD).
Final Thoughts
Whether you hike Malinche volcano all the way up to the peak, or enjoy a picnic in forests below, I hope this guide helps you humbly appreciate the history, geology, culture, and life of this magical volcano.
Be safe and have fun!